Raspberry Pi NAS: Build a Raspberry Pi Samba Server
 https://pimylifeup.com/wp-content/uploads/2015/05/Raspberry-Pi-NAS--600x400.jpg 600w, https://pimylifeup.com/wp-content/uploads/2015/05/Raspberry-Pi-NAS--300x200.jpg 300w, https://pimylifeup.com/wp-content/uploads/2015/05/Raspberry-Pi-NAS--768x512.jpg 768w, https://pimylifeup.com/wp-content/uploads/2015/05/Raspberry-Pi-NAS--1024x682.jpg 1024w, https://pimylifeup.com/wp-content/uploads/2015/05/Raspberry-Pi-NAS--610x407.jpg 610w, https://pimylifeup.com/wp-content/uploads/2015/05/Raspberry-Pi-NAS--1080x720.jpg 1080w" sizes="(max-width: 759px) 100vw, 759px" style="max-width: 100%; margin: 0.5em auto; display: block; height: auto;">
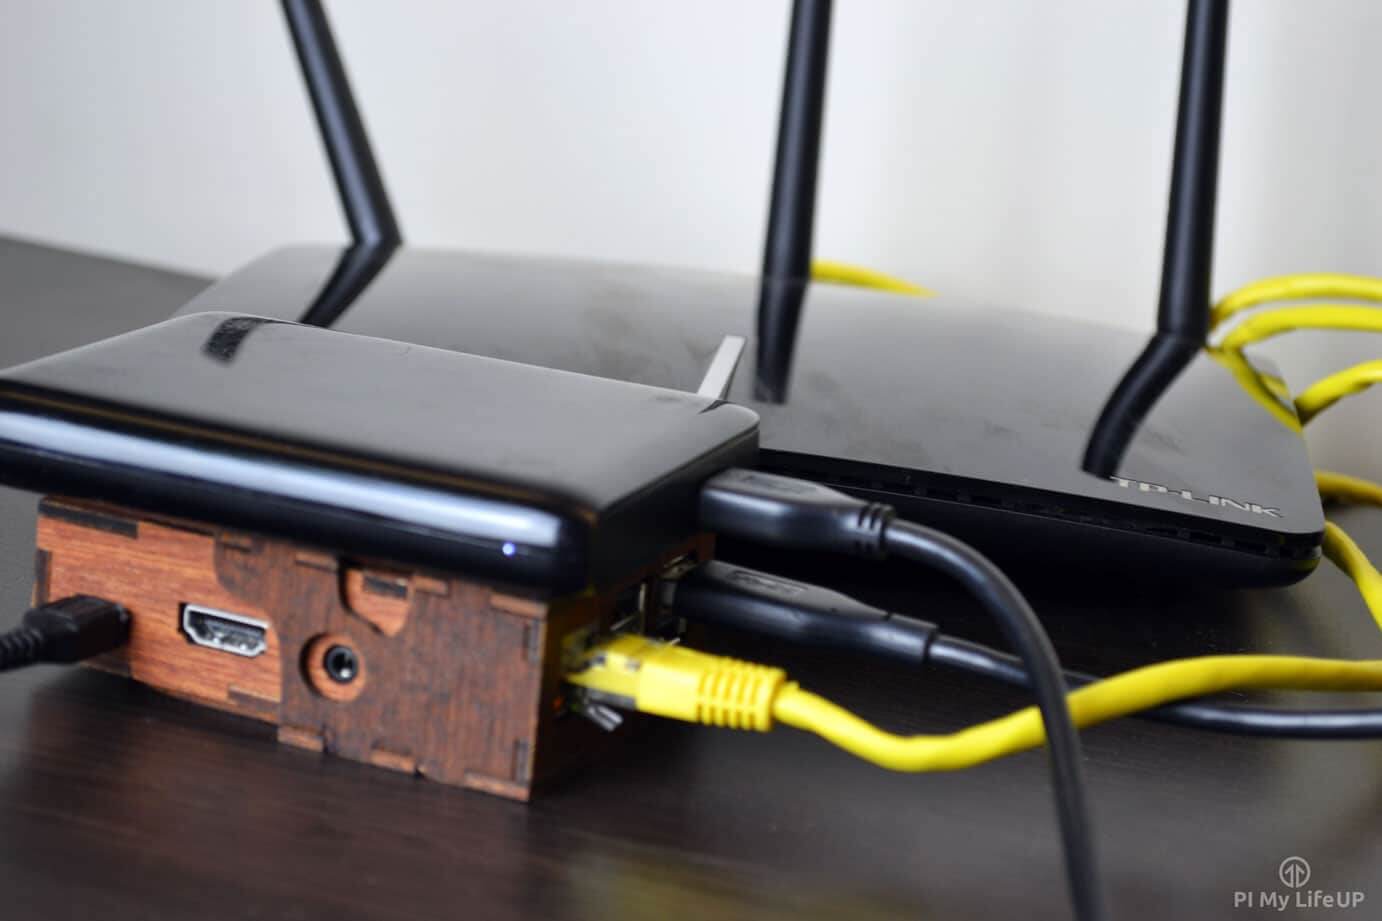
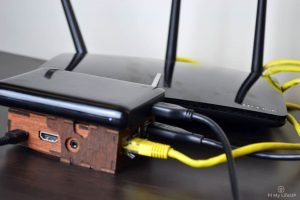
A Raspberry Pi NAS or network attached storage is the perfect way to have files available to anyone within your local network. It is a relatively easy process to set this up and being low powered allows for it to be on 24/7 without costing you a fortune in power bills.
Once you have setup your first drive correctly, you will find this process to be incredibly easy to repeat. You may come across some complications when first setting it up these problems are usually caused by having the permissions set incorrectly.

One other thing that I should mention is that if you’re looking for blazing fast speeds, then you’re unlikely to get them with the Pi. This slowdown is due to having to use the USB ports (2.0) to connect a hard drive and the network interfaces. (100 Mbps Ethernet, 1 Gbps on Pi 3 B plus, or WiFi)
Check out the video below to see how to setup your very own NAS in no time. If you like what you see, then please subscribe, so you stay up to date on all the latest guides, projects and much more.
Equipment
I used the following equipment for this Raspberry Pi NAS tutorial.
Recommended:
SD Card (8GB+ Recommended) or Micro SD Card if you’re using a Raspberry Pi 2, 3 or B+
Optional:
Note: The USB ports on the Raspberry Pi might not be enough to power an external drive so you might need to invest in a powered USB hub.
Setting up the Raspberry Pi NAS
In this tutorial, I use the standard operating system (OS) for the Raspberry Pi. This OS is Raspbian if you would like to install it then check out my guide on how to install Raspberry Pi NOOBS.
Mounting The Hard drives
The first thing to do before we set up the NAS is to mount the external hard drives. For this step it is important that we do this correctly the first time otherwise we could end up with issues later on. You want to be able to mount a drive so it will always be the same even if the Pi loses power or reboots.
1. Bring up the Raspberry Pi terminal either by using SSH or on the Pi itself.
2. First, let’s bring Raspbian up to date by entering the following commands:
sudo apt-get update
sudo apt-get upgrade
3. We will want to install ntfs support so let’s first install the package.
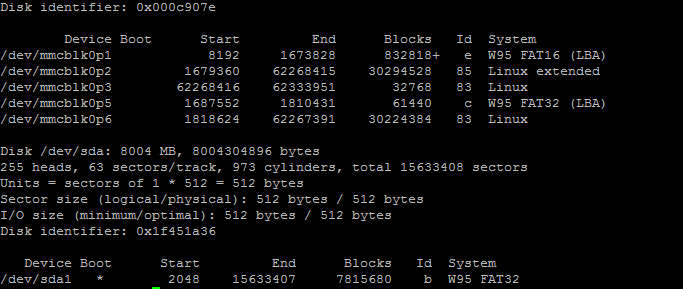
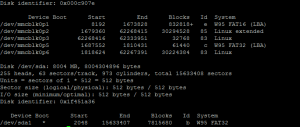
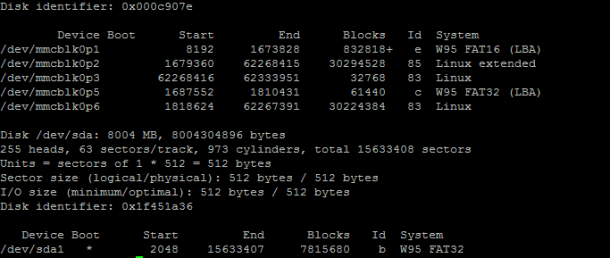
sudo apt-get install ntfs-3g4. Next, we want to find our external hard drive to do this enter the following command.
sudo fdisk -l5. There should be two lots of drives that pop up unless you have more than one drive connected. The first would be the SD card that Raspbian is currently running on (Should be something like /dev/mcbblkop1) ignore this one. There should also be another one that looks similar to /dev/sda1 this is the drive that we will use.
 https://pimylifeup.com/wp-content/uploads/2015/05/fdisk-command-600x254.png 600w, https://pimylifeup.com/wp-content/uploads/2015/05/fdisk-command-300x127.png 300w, https://pimylifeup.com/wp-content/uploads/2015/05/fdisk-command-610x258.png 610w" sizes="(max-width: 683px) 100vw, 683px" style="max-width: 100%; margin: 0.5em auto; display: block; height: auto;">
6. Before we mount the drives, we will need to create a directory to mount. To do this enter the following command. (Remember to fix up the command with the correct drive name)
sudo mkdir /media/NASHDD17. Now before we continue we will need to create a user to login as. To do this enter the following. Note: Update the word pimylifeup to change the username.
sudo useradd pimylifeup -m -G users
sudo passwd pimylifeup
8. You will be prompted to enter a password twice, be sure to remember this password as you may need it later on.
9. Next, we need to get the gid and the uid, make sure you write these down as we will need these items in the next step. Update pimylifeup with the user you created above.
For the gid enter the following:
id -g pimylifeupFor the uid enter the following:
id -u pimylifeup10. Now we need to edit the fstab file so our Pi will automatically mount the drive on boot up and set the correct permissions, to do this enter the following command:
sudo nano /etc/fstab11. Add the following the line to the bottom of the file. Changing the /dev/sda1 to whatever your hard drive is and updating uid and gid as appropriate. (The code below is all one line)
/dev/sda1 /media/NASHDD1 auto nofail,uid=enter_uid_here,gid=enter_gid_here,noatime 0 0 https://pimylifeup.com/wp-content/uploads/2015/05/fstab-600x96.jpg 600w, https://pimylifeup.com/wp-content/uploads/2015/05/fstab-300x48.jpg 300w, https://pimylifeup.com/wp-content/uploads/2015/05/fstab-610x97.jpg 610w" sizes="(max-width: 720px) 100vw, 720px" style="max-width: 100%; margin: 0.5em auto; display: block; height: auto;">
12. Reboot the Raspberry Pi, and the drives should automatically mount with the correct permissions.
Now that we have completed mounting the drives to the folders, we can now move onto setting up the samba server. If you wish to make edits to the folder, do the changes in the mounted folder. For example, if we wanted to make a new directory, we would enter the following.
sudo mkdir /media/NASHDD1/share
Setting up the Raspberry Pi Samba Server
In this part, we will download and install the samba package so we can have a Raspberry Pi samba server up and running. If you want more information on the package and its documentation you can check out the Samba website.
1. First, we will need to install the samba package by entering the following command:
sudo apt-get install samba samba-common-bin2. Just in case we make any mistakes along the way we should back up the samba config folder. To do this enter the following command:
sudo cp /etc/samba/smb.conf /etc/samba/smb.conf.old3. Now let’s edit the config file by entering the following:
sudo nano /etc/samba/smb.conf4. There are several edits we will need to make to this file, first remove the # from the security = user line.
 https://pimylifeup.com/wp-content/uploads/2015/05/security-user-600x106.jpg 600w, https://pimylifeup.com/wp-content/uploads/2015/05/security-user-300x53.jpg 300w, https://pimylifeup.com/wp-content/uploads/2015/05/security-user-768x136.jpg 768w, https://pimylifeup.com/wp-content/uploads/2015/05/security-user-610x108.jpg 610w" sizes="(max-width: 802px) 100vw, 802px" style="max-width: 100%; margin: 0.5em auto; display: block; height: auto;">
5. Next, we will need to add our hard drive to the samba config file. Enter the following to add your hard drive as a share (Update the path if you have something different):
[NAS]
comment = NAS Folder
path = /media/NASHDD1
valid users = @users
force group = users
create mask = 0660
directory mask = 0771
read only = no
6. I’ll quickly explain what each of the things means above so you have a better understanding the Raspberry Pi Samba Server.
- [NAS]: This is the name of the share (What you will see in file explorer)
- Comment: This is a comment for the associated for share.
- Path: Path to the folder you wish to share.
- Valid User: A list of users that are allowed to log in to this share.
- Force Group: This specifies a UNIX group name that will be assigned for all users connecting to this share.
- Directory Mask: This creates a permission mask for all directories created on the drive.
- Read Only: This allows you to set the share to be read-only.
7. Now restart the samba server by entering the following command:
sudo /etc/init.d/samba restart8. Finally, you will need to connect the user to samba, do this by entering the following:
sudo smbpasswd -a pimylifeupTesting the Raspberry Pi NAS
Now we have it all set up we will need to test to make sure everything is configured properly. It is very easy to test so I will go through an example of both Windows and Mac.
Once you have done this test, you should now have a full working Raspberry Pi Samba Server. Be sure to check out the many other Raspberry Pi projects and guideswe have on here. Have troubles or improvements to this tutorial leave us a comment below!
Windows
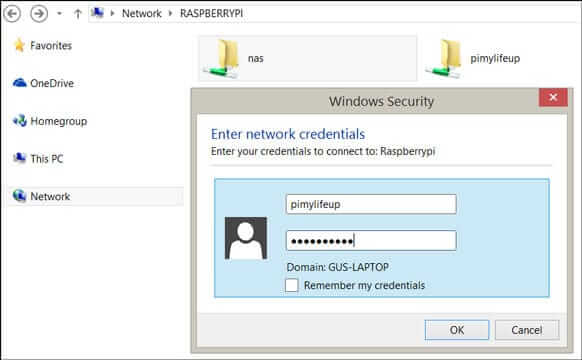
If you have a windows PC, please do the following to access the Raspberry Pi NAS.
1. On a Windows PC open up file explorer.
2. Click on network in the left-hand column.
3. In here open up Raspberry Pi.
4. Double click on the folder.
5. Enter the credentials.
6. You should now be able to save, edit and delete files in this folder.
 https://pimylifeup.com/wp-content/uploads/2015/05/how-to-map-network-drives-300x186.jpg 300w" sizes="(max-width: 582px) 100vw, 582px" style="max-width: 100%; margin: 0.5em auto; display: block; height: auto;">
Mac
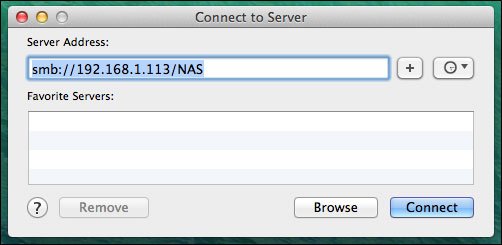
If you have a Mac, please do the following to gain access to the NAS.
1. Click on go, this is located in the top bar. Next, navigate to connect to server.
2. In here add the IP address of the Pi or browse to the Raspberry Pi. (You will need to specify the folder)
3. Enter your credentials.
4. You should now be able to save, edit and delete files within this folder.
 https://pimylifeup.com/wp-content/uploads/2015/05/map-network-drives-mac-300x146.jpg 300w" sizes="(max-width: 502px) 100vw, 502px" style="max-width: 100%; margin: 0.5em auto; display: block; height: auto;">
That’s it, and you should now be successfully connected to your NAS and be able to read and write files. If you’re having trouble with files copying to the drive, then it’s likely your permissions are incorrect, be sure to double check what you have entered.
I hope that you now have the Raspberry Pi NAS up and running without any issues. If you do come across any problems or have questions, then be sure to leave a comment below.

")
")


